
Cooking With Cast Iron
Sample Basic Cast Iron Recipes
|
» The Basics » Skillet Recipes » Dutch Oven Recipe » Baking Recipes |
Fans of cooking with cast iron revere it for its versatility and flexibility. Nothing puts a good sear on a steak or chop like blazing hot cast iron, and few other cooking implements go from stovetop to oven and back with such ease. Breakfast bacon and eggs slide right off a well-seasoned cast iron griddle like glass. Tough meats slowly braise into fork-tender morsels in a cast iron dutch oven. And anyone who knows good cornbread knows it absolutely must be baked in cast iron.
There are a few things you don't want to cook in your new cast iron pan, however. Until the pan is extremely well-seasoned, you should avoid acidic items-- such as tomatoes, wine, or vinegar-- which may deteriorate the basic seasoning and cause iron to be leached into the food. The higher the moisture content of the acidic food and the longer the cooking time, the higher the potential amount of iron absorption.
Cooking spinach, due to the oxalic acid it contains, is also inadvisable, as it can react with the iron and turn the food an unappetizing black color.
In the case of acidic or other reactive foods, it may be best to consider another type of cooking utensil, like enameled cast iron!
The Basics
A few simple guidelines can help ease the learning curve for the new user of cast iron cookware:
- Preheating your cast iron skillet in the oven will prevent the center hot spot which can occur when simply preheating on a burner. When a very hot pan is required, this method is preferred as it avoids the kind of damage which can occur to an empty pan over a very hot burner. If you must preheat to high over a burner, start low and increase the heat in increments a few minutes apart.
- A long as you add heat energy, cast iron will continue to get hotter. A pan heated to high for searing or frying should have the heat reduced to medium during cooking to avoid overcooking, burning or sticking.
- Cast iron reacts slowly to cooking temperature changes; raising or reducing burner or oven temp will not have an immediate effect. Learning to anticipate when critical temperature changes will be necessary is therefore a valuable part of variable temperature cooking in cast iron.
- When increasing from low to medium, one technique is to first set the burner to high for a short interval in order to add heat more quickly, and then back it down to medium.
- When needing to lower cooking temp, remove the pan from the burner altogether for an interval before returning it to the burner reduced to the desired lower setting.
- Or consider using two pans, one warm and one hot, for temperature critical situations, and move the food between them.
- Newly refurbished, manually seasoned pans will not yet possess their best non-stick properties; use a little extra oil or butter for the first several cooks.
Skillet Recipes
Pork Chops and Zucchini
2 8 oz. pork loin chops 1" thick (or other 1" thick chops or steaks)
2 Tbl. high smoke point vegetable oil (peanut, refined grapeseed) divided
Salt & pepper
2 large zucchini, peeled
Greek or Italian seasoning blend
Preheat a #8 (10") or #10 (12") cast iron skillet in oven to 450°F. Season pork chops with salt and pepper or favorite grilling seasoning, and coat lightly with 1 Tbl. of the oil.
Remove both ends and cut zucchini in half crosswise, and slice each half lengthwise into ½" thick sticks. Toss zucchini sticks with 1 Tbl. oil, pinch salt, and 1 tsp. of Greek or Italian seasoning.
Carefully remove hot skillet from oven and place on a burner set to high. Sear pork chops 2 minutes on each side. Flip chops back to first side, add zucchini to pan, and return to oven. After 5 minutes, flip chops and rearrange zucchini. After 4 more minutes, remove pan from oven. A meat thermometer inserted not touching fat or bone should read 150-155°F (lower for beef steaks, according to your doneness preference). Place chops on an inverted plate on a platter to rest, tented with foil, for 3 minutes. Cover skillet to keep zucchini warm until served.
This is a great one pan recipe that can be ready in as little as 30 minutes, pre-heat and prep time included.
Cast Iron Skillet Salmon
1 to 1.25 lb. fresh salmon fillet, skin on
Kosher salt & fresh ground black pepper
1/4 C. plain Greek yogurt
1 T. lemon juice
1/2 t. dill weed plus extra for garnish
Pre-heat a #8 or #10 cast iron skillet with a tablespoon of canola oil in a 350°F oven. Depending on the size and shape of the salmon filet, slice crosswise in to 4 equal portions, roughly 1½" wide by 5" long. If an edge of the whole piece is markedly thinner, remove it by slicing it away lengthwise from the rest, so the remaining part can be divided crosswise into pieces of roughly the same thickness overall, about 1¼" average. 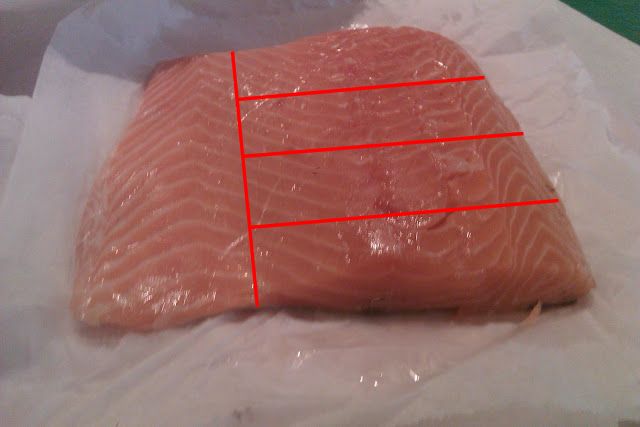 Season flesh side of salmon with kosher salt and fresh ground black pepper. Remove skillet from oven and place on a burner set to medium. Use spatula to distribute oil evenly, if necessary. Place salmon pieces skin side down and cook for 3 minutes. Flip all pieces over to flesh side down. (If you have a trimmed off thinner piece, place it in the skillet flesh side down now.) Cook for 3 more minutes. Flip all pieces back to skin side down, arranging them so they are not touching. Return skillet to the oven to cook for 10 more minutes. Fish should be opaque throughout, flaky, but still moist. Remove to plate with spatula, and garnish with a pinch of dill. Yield 4-5 4oz. portions. Serve with topping sauce and sauteed green vegetables such as asparagus or string beans.
Topping Sauce
Whisk together yogurt, lemon juice, ¼t. salt, ¼t. pepper, and ½t. dill. Serve either on the side or with a dollop on each piece.
Fresh Mango Salsa
A freshly made mango salsa also goes well with salmon, and is simple and quick to make, even while the fish is cooking.
1 C. finely diced ripe mango*
¼C. finely diced red onion
1 T. finely chopped fresh cilantro
juice of 1/2 lime
pinch kosher salt
pinch cumin
pinch ground chile powder
Mix all at room temp and allow flavors to marry while preparing fish. Top each portion just before serving with a generous couple of spoonfuls.
*Peeling and cutting up a ripe mango can be a real mess sometimes-- look for mango cubes in your grocer's freezer section; they dice easily while still semi-frozen, and there's no waste.
Cast Iron Skillet Chicken
From America's Test Kitchen/Cook's Country
1 3½-4 lb fryer, cut up into 8 pieces
for the seasoning:
2 t. salt
2 t. paprika
1 t. black pepper
1/2 t. onion powder
1/2 t. granulated garlic
1/2 t. dried thyme
2 T. butter
Place heavy #10 or #12 skillet (think modern Lodge) in cold oven and set to 450°F.
While while oven (and pan) preheats, mix up seasoning ingredients. Cut whole chicken into pieces: legs, thighs, breast halves, wings. Trim excess fat and skin as desired. Save backbone and wing tips for making stock.
Pat pieces dry with paper towel. Sprinkle both sides with seasoning, as evenly as possible.
Carefully remove very hot pan from preheated oven to stovetop. Melt butter in pan (no need to turn on burner).
Arrange chicken pieces in skillet skin side down. Roast in oven 15 minutes. Flip pieces skin side up and roast
15 more minutes or until 165°F in breast, 175°F in thigh. Remove to platter and rest 5 minutes. Reserve buttery,
seasoned pan juices to drizzle over chicken.
Serves 2-4.
The recipe is easy enough so as to be virtually foolproof. While the seasoning and high heat cook result in flavorful
and visually appealing chicken, my experience is that it does not necessarily result in the crispy skin the
ATK recipe promises. It does, however, result in very juicy chicken, both light and dark meat. You can also purchase
already cut up fryers for a little more money and trim to your liking. Or if skin-on chicken breasts are on sale,
that's another option. If on the smaller side, they will be done in 22-24 minutes total.
Cast Iron Skillet Boneless Chicken Breast
1.5 lb. boneless skinless chicken breast meat (2 med. to large pieces)
coarse kosher salt
low-salt dry seasoning blend
1 Tbl. canola oil
The night before, "dry brine" skinless boneless chicken breasts by sprinkling 1/8 tsp. kosher salt on each side and wrapping individually in plastic wrap. Place in container to catch any liquid released.
Preheat oil in #10 cast iron skillet in a 350°F oven. Remove chicken from plastic wrap and carefully slice each horizontally in half. Place plastic wrap over pieces and use flat of knife blade or other suitable object to pound any thicker parts of pieces so they are of more uniform thickness (about 1/2" overall). Season each piece on both sides lightly with preferred seasoning blend. Remove skillet from oven and place on burner over medium heat. Arrange all 4 pieces not overlapping in skillet and cook for 2 minutes. Flip and cook for 2 minutes more. Remove at once to a plate to stop cooking. Serve with sauteed or steamed vegetables.
Cast Iron Skillet Baked Potatoes
Pre-heat oven to 400°F. Liberally butter the bottom of a large (at least a #8) cast iron skillet. Cut in half lengthwise, along the axis that results in the greatest cut surface area, your choice and number of potatoes to fit comfortably in skillet in a single layer. Place halves cut side down in skillet and brush tops (skins) very lightly with canola oil. Sprinkle with kosher salt and fresh ground pepper. Bake undisturbed for 45-60 minutes, testing with a skewer for doneness and checking bottoms for brownness at 45 minutes. Serve immediately.
Cast Iron Popcorn
Popcorn in a cast iron skillet or dutch oven is easy, and has the benefit of building additional seasoning while producing a tasty snack. Make sure your popcorn is fresh; that stored in a glass jar is best, as its moisture content is preserved. Choose a neutral, high smoke point oil like refined grapeseed or peanut.
You'll also want some popcorn salt, and, optionally, butter. Popcorn salt is finer than table or kosher salt, and sticks to the popped kernels better. Using a mortar and pestle, you can grind table or kosher salt to a finer consistency. Melt your butter, preferably unsalted, while the popcorn pan is heating, so it will be ready.
Regardless of whether you use a skillet or a dutch oven, you'll need a lid. It doesn't need to be the most tight-fitting, but it needs to be able to keep the corn and hot oil from spattering all over the place (and you). Use a #10 skillet or a #8 dutch oven for the purposes of this recipe, and adapt it to your preference. Note: A skillet, with its built in handle, can be easier to agitate during popping. But you're more likely to have a lid with a dutch oven.
Add a tablespoon of oil and three kernels of popcorn in your chosen cast iron vessel, and place the cover on. Heat the oil slowly over a burner set to medium. When you hear the three kernels pop, you know the oil is hot enough.
Add your popcorn. One quarter cup is good for two servings; a half cup, after popping, should not be too much for either of these pans. Replace the cover and give the pan a little shake to spread the kernels around. As the corn pops, shake the pan intermittently to keep burnt popped kernels to a minimum. When the popping slows to about 5 seconds between pops-- after about 2-3 minutes-- remove from the heat and wait another 15-30 seconds before removing the lid.
Add the salt in pinches and toss between each, testing for saltiness as you go. Add your butter and toss to distribute.
Dutch Oven Recipe
Chili Colorado (adapted from The Complete Meat Cookbook by Aidells & Kelly)
4 ancho or mulato chiles, or other large, dried red chiles
4 pounds beef chuck, fat trimmed and cut into ¾" pieces
Salt & freshly ground black pepper
¼ C. ground chile powder
2 medium onions, coarsely chopped
6 garlic cloves
1 tsp. cumin seeds
1 tsp. dried oregano
½ tsp. ground coriander
2 tsp. salt
1 C. beer, preferably Mexican
Soak the dried chiles in boiling hot water to cover for 1 hour.
Preheat oven to 350°F.
Season meat chunks with salt and pepper. Brown in small batches in cast iron dutch oven on the stovetop. Set aside.
Drain chiles, remove stems and seeds. Place chiles, chile powder, onion, garlic, cumin, oregano, coriander, and salt in food processor. Pulse to chop, then process into a thick paste. Add beer and continue processing to blend.
Place meat and any accumulated juices back in dutch oven, pour in sauce and stir well.
Cover dutch oven with a sheet of foil, then place lid on for a tight seal. Bake on middle rack of oven for 1½ to 2 hours. Stir at 1 hour and then every 15 minutes thereafter, until meat is fork-tender, and adding more beer if sauce seems too thick.
Serve with pinto beans and rice.
*Note this is a "real chili" recipe, with no tomatoes or beans, just meat, chiles, onions and seasonings. There is nothing acidic to compromise the seasoning of the cast iron or leach out excess iron into the food.
Baking Recipes
Cast Iron Skillet Cornbread
2 C. cornmeal
½ C. flour, sifted
1 tsp. baking powder
1 tsp. salt
1 egg, lightly beaten
2 C. buttermilk (or milk)
2 Tbl. vegetable oil
Set oven to 450°F. Put oil in a #8 (10") cast iron skillet and place in oven until set temperature reached. Mix together dry ingredients, and set aside. Whisk together egg and buttermilk, and mix with dry ingredients, adding wet to dry, until just combined. Carefully remove skillet from oven, pour hot oil into batter, and stir to mix. Pour batter into skillet, return to oven and bake for 20 minutes. Cornbread should be browned on top, and pulling away from sides of skillet. A toothpick stuck in the center should come out clean. Remove and allow to cool a few minutes before turning out onto a plate for slicing. Serve with butter or honey.
This is a basic cast iron cornbread recipe. There are several others with variations of ingredients, but all should include oiling and preheating of the cast iron pan, and most the step of adding hot oil to batter right before baking.
Dutch Oven No-Knead Bread
Store-bought artisan breads with crisp, shiny crusts are the product of baking in commercial steam-injected ovens. You can replicate this process at home by baking in a covered cast iron dutch oven, preferably an enameled one or, if not, one that is well-seasoned. Trapped moisture from the dough itself does the trick.
Here's a recipe inspired by baker Jim Lahey, and which gained fame after a report by NY Times food writer Mark Bittman. It calls for a low-yeast, relatively wet dough, which is long-fermented rather than kneaded.
Before we start, note that if you strictly follow the 500°F temperature called for, you'll need to replace your ECI dutch oven's phenolic handle with a stainless steel one. Otherwise, you'll be restricted to the manufacturer-specified temperature limit¹, and results may vary.
Here are some links to articles and recipes using the technique to get you started:
https://www.sullivanstreetbakery.com/recipes ![]()
https://www.nytimes.com/2006/11/08/dining/08mini.html?ref=dining ![]()
https://www.nytimes.com/2008/10/08/dining/081mrex.html?ref=dining ![]()
A summary of the basic methodology is as follows:
Mix, rise, and form dough into boule according to chosen recipe. To facilitate handling, rest on a piece of parchment paper at room temperature for one hour prior to baking. Sprinkle some bench flour on top of boule, and make several slashes in top of dough 1/4" deep and about 1" apart.
Preheat the covered pot in the oven at 500°F for 20-30 minutes. Carefully remove pot from oven and remove lid. Drop dough on parchment paper straight down into pot, replace lid, and return to oven.
After baking for 15-20* minutes, remove the lid. Reduce heat to 450 and continue to bake 15-20* more minutes. Use a spatula to assist in removing bread from pot. Remove parchment paper and place bread on a rack to cool. Slice with a sharp serrated bread knife.
*Timing will vary according to recipe used, and size of bread and pot. Some experimentation may be required.
  
|
||
| Any purchases you make from Amazon can help support this web resource. Click to find out how. | ||
|
|
||


|
This site is a participant in the Amazon Services LLC Associates Program, an affiliate advertising program designed to provide a means for sites to earn advertising fees by advertising and linking to Amazon.com or its affiliates. |