when to stop etank?

Matt.M

New member
thanks to all who have shared that made my first attempt at electrolysis easier and somewhat successful.

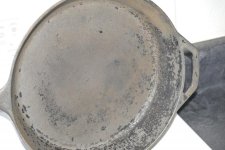
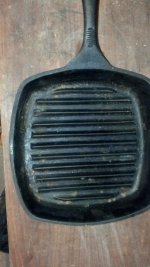
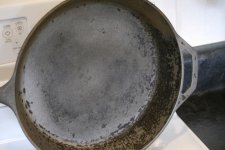
I just finished an old Lodge 12" skillet that is about 2" deep. I am having a hard time getting what must be really good carbonization and polymerization off the sides and am wondering if I'm expecting too much and if this is just elbow grease at this point or if I need to alter my set up.

If the latter, I was thinking about dangling a circular wire into the laid flat pan, but if it isn't going to pull off much more, then I won't bother.

your wisdom is appreciated...
 
Assuming everything flowing well, current-wise, the majority should come off in a few hours. That 1% that just won't budge after that will have to be scrubbed or carefully scraped so as not to leave scratches. I have a 1" blade putty knife I've rounded the sharp corners off of with a file. If the leading edge is kept flat against the surface, which on sidewalls means working in the horizontal, those carbon warts can usually be taken off without a problem. The stains they leave can be minimized with steel wool and vinegar.
 
If the sides in question can clearly see the positive electrode give it another 12 hours. If you can not detect any improvement it is time to stop and scrub. As there are unlimited configurations of e-tanks you need to determine where you have a direct line of sight and where you don’t. Some use one rod successfully with movement of the article and some have a 360° positive electrode.

Hilditch
 
Matt,
I've left a pan in the e-tank for a couple of days or more. I don't know if additional time helps, but you can't hurt the pan by leaving it in an e-tank. I've also taken a pan out, scrubbed it, and put it back in to let it continue working.

And, I've also had to take a scraper to some stubborn spots. In my case, the scraper was able to get up under the stubborn spots and they popped right off.
 
This was in for about 12 hours, so I must have not got the electricity flow correct. I used an automatic Schumaker because it made bubbles I figured that meant it was working. Or there wasn't enough charge actually getting to the water.

Because I don't know how to actually test the charge in the water and how effective it is, I just went by the fact that stuff was moving around and a lot of rust and carbon did come off...

I used two steel plates on either side and it worked ok overnight, but they weren't covered with gunk that I could remove. They either have some coating on them, or they are so slick they shed all the crud...

Then I put a piece of rebar in and it had a bunch of gunk on it-along with the wired attached to it- which I'm hoping is from the pan and not stuff that was floating in the barrel.

Am I wrong to assume that if I'm seeing bubbles everything is working correctly if inefficiently?
 
If a haze of bubbles emanates from the pan, and the coating materially releases in the course of a few to several hours, it's working fine. If you've gone 12 hours already, another 12 isn't going to help. Post a photo if you can, so we can see the progress and current status.
 
Matt,
I've left a pan in the e-tank for a couple of days or more. I don't know if additional time helps, but you can't hurt the pan by leaving it in an e-tank. I've also taken a pan out, scrubbed it, and put it back in to let it continue working.

And, I've also had to take a scraper to some stubborn spots. In my case, the scraper was able to get up under the stubborn spots and they popped right off.

Now I really don't know what to do! :eek:

At least I have options...

So, what removes the carbonization?...is it the hydrogen and oxygen splitting and working under the carbon to help release it? I know for super burned on stuff on stainless steel, a trick is to boil hydrogen peroxide to get between the carbon and steel...or did I not have a good sacrificial piece of metal overnight...

It did remove all the rust and grease and a lot of the carbon, but it isn't that super clean gray steel color I see in photos....

---------- Post added at 02:37 PM ---------- Previous post was at 02:35 PM ----------

I think bubbles mean it is working correctly.

Hilditch

Good to know...has anyone ever checked with a multimeter to find out what the flow is or should be? Does that even make sense? I'm not to smart when it comes to things electrical....

---------- Post added at 02:45 PM ---------- Previous post was at 02:37 PM ----------

If a haze of bubbles emanates from the pan, and the coating materially releases in the course of a few to several hours, it's working fine. If you've gone 12 hours already, another 12 isn't going to help. Post a photo if you can, so we can see the progress and current status.


Thanks, I'll get the photos up that I just took...
 
The average charger is a 2/10 amp switchable model. Mine usually pulls an average 8 amps at the 10 amp setting when things are flowing well. It will differ from pan to pan, but 6 to 8 on the charger's meter will do that which normally can be done.
 
Here are the photos...one with flash that also shows the flash rust (dagnabit) and the other is with natural light....
 

Attachments

  • lodge flash 1.jpg
    lodge flash 1.jpg
    60.5 KB · Views: 59
  • lodge no flash 1.jpg
    lodge no flash 1.jpg
    58.5 KB · Views: 57
The average charger is a 2/10 amp switchable model. Mine usually pulls an average 8 amps at the 10 amp setting when things are flowing well. It will differ from pan to pan, but 6 to 8 on the charger's meter will do that which normally can be done.

I ran it at 10 overnight and then switched to 50 this AM. I don't think near that amount gets to the solution. The meter on the charger is broken or doesn't work, but I checked at my gator clip connections and it was running about between 10-12 amps. Do you see fluctuation like that or is it something that should be fairly constant?

thanks...
 
50 amps is overkill, more goes to heat than action. You might just want to level that remaining stuff off with a stainless steel Chore Boy, and start seasoning. It will all blend in and even out in time.
 
If the sides in question can clearly see the positive electrode give it another 12 hours. If you can not detect any improvement it is time to stop and scrub. As there are unlimited configurations of e-tanks you need to determine where you have a direct line of sight and where you don’t. Some use one rod successfully with movement of the article and some have a 360° positive electrode.

Hilditch

I'm wondering about the LOS aspect....the edges sides of the pan don't get much exposure, but it does look like it's worked on part of it so perhaps that's the issue....I was thinking about just dropping a piece of coiled wire to sit in the interior below the sides...or am I not correctly understanding LOS as two surfaces opposing each other?

---------- Post added at 03:08 PM ---------- Previous post was at 03:05 PM ----------

50 amps is overkill, more goes to heat than action. You might just want to level that remaining stuff off with a stainless steel Chore Boy, and start seasoning. It will all blend in and even out in time.

Gotcha...thanks...so now it's elbow grease... do people just spend a lot of time polishing and cleaning their cast iron? Does this look pretty typical of what comes out when you do a piece in an etank?

---------- Post added at 03:09 PM ---------- Previous post was at 03:08 PM ----------

50 amps is overkill, more goes to heat than action. You might just want to level that remaining stuff off with a stainless steel Chore Boy, and start seasoning. It will all blend in and even out in time.


I'm not understanding why my posts are being included in other replies...sorry for any confusion....
 
Electro is largely a line of sight process, and is more efficient when the anode is unobstructed, closer to the piece, of larger surface area, and/or positioned to face multiple surfaces of the pan, but it's not required for the process to work.

The elbow grease part is unfortunate, but sometimes just a fact of life. Depending on how much the pan was used, some parts of a long term seasoning closest to the metal are reduced to mostly nothing but carbon, and that's the part lye and electro have difficulty with. While some have the goal of totally stripping the piece and applying a cosmetically attractive manual seasoning mainly for display, others just restoring a pan for use may not be as particular about this kind of residue that's been buried under years of seasoning because they know it will soon be again, and won't affect performance.

The forum software merges replies made by the same user if they follow each other within just a few minutes.
 
thanks for that...it's good to know that there's a distinction between performance and cosmetic and i guess if some carbon is that hard to get off, it deserves to stay.

I changed to a shallow tank set up where the pan laid flat and used a little plastic insert that I put some wire in as an annode...It made a bunch of green junk on the wire so I took it out cleaned everything and then switched to a piece of rebar that seemed to work much better. The two steel plates must have some coating that keeps them form exchanging ions and that's why it was such a slow process.

I did scrape off a bunch of the carbon and then went about seasoning per the instructions on the site as well as two other pans. I'll get some shots up shortly as it's cooling right now...

Thanks again...
 
and this is the lodge...i didn't get a before shot, but a lot of gunk came off it and the surface rust was pretty bad... the sides were seasoned OK, but not the cooking area...
 

Attachments

  • lodge after season.jpg
    lodge after season.jpg
    34.5 KB · Views: 39
That looks good. Probably the second and last time in it's life it will be that clean and good looking. (The grill.)

Hilditch

I do believe the Lodge will work out just fine.
 
Last edited:
this is what the grill pan looked like before...it's hard to tell from the pictures, but there was a lot of oil that had not turned to seasoning...I think I messed it up when I first got it and tried to put on too many layers too quickly...
 

Attachments

  • ci grill before top.jpg
    ci grill before top.jpg
    50.1 KB · Views: 35
Back
Top